Viewing a Model's List Price History
EPASS records the List Price code and selling price of a model when it's added to an invoice. This creates a historical snapshot of the model’s pricing at that moment in time. Other departments, such as Purchasing, can use this information to better understand why specific prices were applied (for example, if a promotional buying program was active).
Workflow
Sales staff add a model to an invoice and selects a List Price from a dropdown, which then automatically populates the Selling Price field. (The User can edit the List Price code and the selling price if needed.)
![]()
Once the invoice is closed, EPASS records the List Price code and the selling price.
When the invoice is reviewed or edited and a model line is selected in Invoice Detail, a question mark icon appears in front of the List Price code dropdown. Clicking the icon opens the Price History table that contains all the List Price codes and selling prices for the model when it was added to the invoice.
A red icon indicates that a list price was selected but the selling price was manually changed.
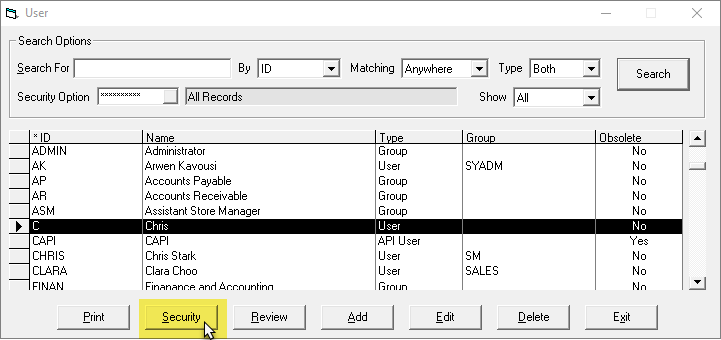
- You can control who can access and view the Price History table through security options. The
?icon is completely hidden for Users that do not have the appropriate security options. See User Security in the Setting Up section for more information.
Setting Up
User Security
There is a security option that controls viewing access to the Price History table. Follow the steps below to activate it for each EPASS User and Group that needs viewing access.
Steps
-
Go to Tools > System Maintenance.
-
On the Tables tab, click User Security, and then click Open.

-
Click a User or Group, and then click Security.
-
In the Keyword field, enter
View Model List Prices.
-
Select View Model List Prices from when Model was added.
-
Click OK.
-
Repeat steps 2–5 for additional Users or Groups.
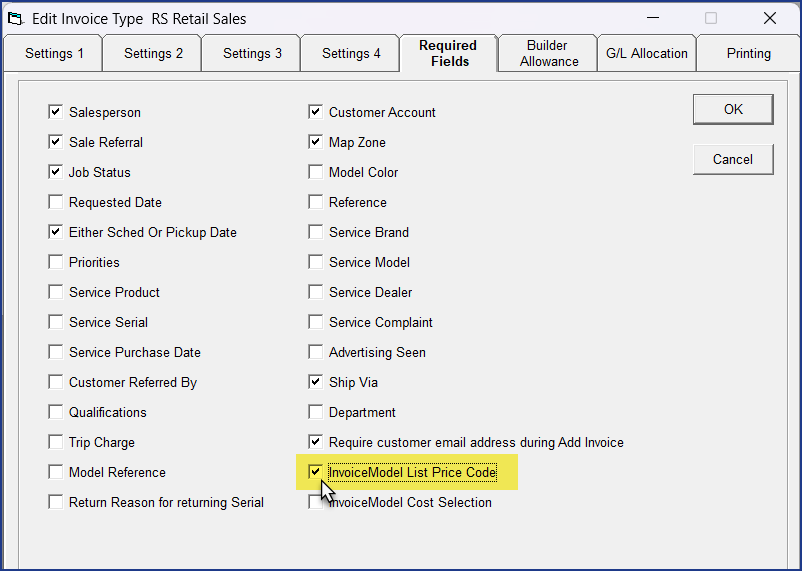
Prevent List Price Code Editing
By default, EPASS Users can edit the List Price drop down, allowing them to enter a custom List Price code. You can prevent this by making the List Price a "Required Field" and force them to only select an existing List Price from the drop down menu.
Steps
-
Go to Tools > System Maintenance.
-
On the Tables tab, click Invoice Type, and then click Open.

-
Click an Invoice Type, and then click Edit.

-
Click the Required Fields tab.

-
Select InvoiceModel List Price Code.
-
Click OK.
-
Repeat steps 2–5 for additional Invoice Types.
OE-04 Written Models Report
You can have a model's List Price code and selling price display on the OE-04 report.
Steps
-
Go to Invoicing > Reports..1 > OE-04 Written Models.
-
Fill out the report parameters on the Selection 1 tab.
-
Click the Selection 2 tab.
-
In the Optional Fields on Report section, select Selling Price and List Price Code.

OE-38 Invoice Audit Report
Any changes to an invoices list price is listed on the OE-38 Invoice Audit Report.
![]()